


Making a DIY formal dress is one of the most ambitious and satisfying projects a tailor or craft tailoring workshop can tackle. It requires technical expertise, an aesthetic eye, and, above all, a thorough knowledge of formal dress fabrics: the choice of material is crucial to the final result.
Manifattura Foderami Cimmino explains well the complete process, which starts from the selection of fabrics to arrive at the packaging of the dress, designed for professionals in the sector: tailors, high fashion workshops, buyers and textile artisans who seek quality materials for individual or series production. Here are all the secrets to sewing a DIY formal dress impeccably.

Where to start: the right questions to choose the right fabric for a formal dress
Before choosing one of Cimmino’s wholesale online ceremony fabrics, you need to figure out which material is best suited to the project you have in mind. Choosing the right ceremonial fabric depends on several factors, and to best orient yourself, it’s worth answering four questions. They are the ones that distinguish a conscious purchase from one that turns out to be wrong only when the fabric is already on the cutting table.
- What silhouette does the dress have? A column dress and a wheel dress require completely different fabrics: one soft and fitted, the other stiff and voluminous.
- What season will the ceremony be held? A fabric as heavy as velvet is perfect in winter, but wearing it in summer would be a problem.
- What kind of event is it? A formal religious wedding, a summer reception, a civil ceremony: each setting has its own dress code.
- What is the budget available? Some fabrics, such as Chantilly lace or silk organza, come at a high cost. Knowing your budget in advance helps you make sustainable choices without sacrificing quality.

Fabrics for formal wear: characteristics and when to use them
Ceremonial dress fabrics are not all the same, and knowing the differences is essential to achieving the desired result. They can be grouped into three families based on their characteristics, contexts of use and the way they behave during the sewing phase.
Lightweight and flowing fabrics: chiffon and satin
They are the right choice when you want a formal dress that follows the body, moves gracefully and guarantees an ethereal or sophisticated effect.
- Chiffon — very light and semi-transparent, it is perfect for drapes and overlapping layers. It always requires the addition of a matte lining and must be worked with a fine needle (70/10) so as not to ruin the fabric during sewing.
Discover the fabrics: Chiffon Marinella e Chiffon Donatella Crepe
- Satin — featuring a mirrored surface and flowing drape, ideal for fitted silhouettes and glided skirts. You have to be very careful when choosing the type of satin because it is sensitive to pin marks and does not forgive errors on the thread right.
Discover the fabrics: Raso Duchesse Color e Raso Fortuna

Structured and voluminous fabrics: organza and taffeta
When the dress for a ceremony must have presence, volume and a well-defined shape, these are the materials to consider.
- Organza — stiff and semi-transparent, it is perfect for full skirts, puff sleeves and decorative bows. It is worked with French seams to avoid fraying.
Discover the fabrics: Organza Arcobaleno Unito e Tessuto Organza Lumina
- Taffeta — compact and shiny, produces a slight rustle when moving. It’s the easiest formal fabric to machine-work: a good choice for those new to these materials.
Discover the fabrics: Taffettas Moire/Sumatra e Tessuto Taffetà Unito Persia

Decorative and precious fabrics: lace, brocade, velvet
The fabrics are what give a dress its character and identity. They require more experience, but the result is visually striking.
- Lace — irreplaceable for bodices, sleeves and decorative inserts. It can be used as the main fabric of the dress or to add rich details. It should be cut by hand following the embroidered pattern, not the outline of the pattern.
Discover the fabrics: Pizzo Elastico Daisy, Pizzo Elastico Lily e Pizzo Elastico Sofia
- Brocade and damask — structured fabrics with woven patterns, suitable for formal ceremonies, classic wedding dresses and sacred vestments. They require care in matching patterns during cutting.
Discover the fabrics: Broccato Havana e Broccato Cachemire
- Velvet — rich and visually striking, it is the natural choice for winter ceremonies. Basic rule: always cut in the same direction as the hair, without exception.
Discover the fabrics: Velluto Paillettes Electra, Vellutino Stretch e Vellutino Stretch Light

Organza or chiffon: how to choose between the two most used fabrics for the ceremony
These two very popular fabrics for formal wear are both lightweight and semi-transparent and are often confused, but they behave completely differently on the cutting table and the finished dress. The difference between organza and chiffon lies entirely in rigidity: the organza maintains its shape and creates volume, while the chiffon adapts to the body and slides. In many contemporary creations they are used together: organza is used for the internal structure, chiffon as an external layer to soften the silhouette.
| FEATURE | ORGANZA | CHIFFON |
| Texture | Rigid, keeps the shape | Soft, follows the body |
| Visual effect | Structured volume, stage presence | Lightness, smooth movement |
| Main use | Full skirts, bows, puff sleeves | Drapes, overlapping layers, romantic dresses |
| Transparency | Semi-transparent — requires petticoat | Very transparent — requires lining |
| Manifacturing | French or ribbon seams, needle 70/10 | Needle 70/10 jersey, silk thread, light hands |
| Recommended combination | Often combined: organza as the internal structure, chiffon as the external layer for softer effects | |

How much fabric does it take to sew a long formal dress?
Once you’ve chosen the best formal dress fabric, you need to calculate the yardage before purchasing. The quantity varies greatly depending on the silhouette: a column dress and a wheel dress are completely different projects even in terms of the material needed. The following values refer to an Italian size 42. For larger sizes it is recommended to add 0.3–0.5 mt per piece. You should never forget to allow an extra 10–15% margin for patch defects, filming and samples.
| SILHOUETTE | MAIN FABRIC | LINING | NOTES |
| Column / long sheath | 3,0 – 3,5 mt | 2,5 mt | Margin +10% for defects |
| Mermaid | 3,5 – 4,0 mt | 3,0 mt | Watch out for thread on satin |
| Wheel / princess | 5,0 – 7,0 mt | 3,5 – 4,5 mt | + tulle for structuring petticoat |
| With short train (50 cm) | + 0,5 mt | + 0,5 mt | To be added to the basic silhouette |
| With long train (150 cm) | + 1,5 mt | + 1,0 mt | To be added to the basic silhouette |
| Lace inserts | 1.0 – 2.0 mt separated | — | Cut on pattern, no standard reserves |

How to sew a formal dress: the manufacturing steps
With the chosen fabric and the calculated yardage, you can move on to the actual packaging of the formal dress, a process that is divided into several phases.
1 — Measurements and pattern
To sew a DIY formal dress, always start with the updated measurements. All necessary measurements are noted: torso, waist, hips, shoulder-waist length, waist-floor length. It’s not enough to rely on previous ones or the measurements you think you already have: the body changes even in a few months and a formal dress must be impeccable.
Once the measurements have been detected, the model is chosen or built. Those who work with industrial bases (standard Italian sizes 36–52) will almost always have to make personalized adjustments, especially on the bodice. Those who build the pattern from scratch instead start from the base of the bust and modify it according to the desired silhouette.
In the case of fine fabrics for women’s dresses with complex structure, such as in the presence of boned bodices, full skirts, dresses with train, it is strongly recommended to make a test toile in cheap cotton before touching the final fabric.

2 — The cut: rules for delicate fabrics
Cutting is the stage where the most difficult mistakes to correct are made. Some rules apply to all ceremonial fabrics, others are specific to each material.
In general, the fabric should always be laid without tension on a rigid, wide plane. If the fabric is folded over the pile or weft, it should be left to rest lying down a few hours before cutting, to prevent it from receding after sewing.
Pins are not used for cutting organza and chiffon because they would leave permanent marks. It’s best to use flat weights or double-sided seamstress tape to hold the pattern pieces in place. To prevent the fabric from slipping during cutting, you can place it under a sheet of tissue paper.
The filo right must be respected precisely. On satin and taffeta a mistake of a few degrees completely changes the way the fabric falls and it is impossible to then hide the defect. As for velvet and brocade, however, the problem is the direction of the pile or pattern: all the pieces of the dress must be cut in the same direction, without exception.
Lace deserves a separate mention: it is not cut on the geometric shape of the pattern, but following the embroidered pattern. You must, therefore, move the piece of the pattern until you find the position where the pattern is centered and symmetrical, even if this wastes fabric. It’s a time-consuming step, but it’s the one that makes the difference between a lace insert that looks randomly placed and one that looks custom-made.

3 — Sewing and packaging
The dress’s packaging always follows the same logic: it starts with the structural seams, those that shape the dress, and ends with the finishing touches. You work from the center outwards, never the other way around.
The type of stitching depends on the fabric. For chiffon and organza, French stitching is used: the fabric is sewn on the reverse, trimmed, then folded and sewn again, so as to completely enclose the seam allowance. The result is a clean seam on both sides, which does not fray and is not visible in transparency, a fundamental feature on semi-transparent fabrics.
For velvet and satin, the hem is done with invisible stitching, by hand or with a special foot. This technique allows the hem to be lowered without the stitch being visible on the right side of the fabric.
If the dress features a structured bodice, with boning, heart shape, or molded shoulder straps, the bodice should be reinforced before packaging with a lightweight iron-on interface applied to the reverse of the fabric. The interface prevents the fabric from deforming over time and supports the bodice structure without weighing it down.

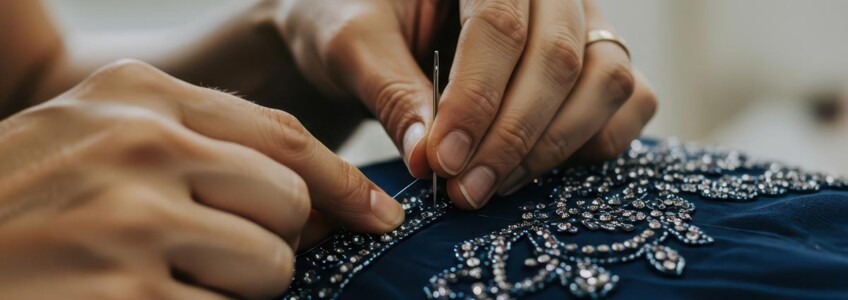
4 — Lace application
Applying lace to the dress is one of the most delicate operations of the entire process. The method that gives the best results involves two distinct steps.
First, place the lace exactly where it should be and temporarily secure it with basting thread or cold vinyl fabric glue. There is no need to use hot glue because it could damage the fibers or leave streaks. This step serves to stabilize the lace before sewing, preventing it from shifting during processing.
Only then is it sewn by hand, with an embroidery needle and lace-colored thread, following the edge of the pattern. It’s not a quick process, but it’s the one that gives the cleanest and longest-lasting result. Running the machine directly over Chantilly lace, especially on a fine floral pattern, risks warping the design and leaving a visible dot line that breaks the elegance of the pattern.
If the lace is on an exposed edge (for example, the skirt bottom or the edge of a sleeve), the seam allowance should be cut flush with the pattern and finished with hand stitches, without re-tapping.

5 — Lining and interior finishing
The importance of the lining is often overlooked, but this very element plays a key role in distinguishing a finished dress from a barely sketched one. The lining serves three purposes: to protect the outer fabric from perspiration and wear, to ensure comfort for the wearer, and to give the dress a refined interior finish, visible every time the dress is worn or delivered to the customer.
The choice of lining fabric depends on the silhouette and the outer fabric. Acetate or polyester satin is used for tight-fitting clothing: it is lightweight, slides over the body, facilitating movement, and does not create friction with the outer fabric. For voluminous dresses, those with a full skirt or princess, it is added under the soft tulle as a structuring petticoat, which gives volume without weighing down. In some cases, a layer of organza is also inserted between the lining and the outer fabric: it is an interlayer that adds body and support to the skirt without significantly increasing its weight.
The lining sews separately and then joins the dress at waist height or is applied around the waist with an invisible seam. The lining and dress hems are managed separately, always leaving a few centimeters of difference in length to allow for natural movement.

Which needle to use and how to sew each ceremonial fabric
Each fabric has its own needs in terms of needle, type of stitching and practical measures. Here is a very useful table to consult when processing the different types of formal dress fabrics.
| FABRIC | RECOMMENDED NEEDLE | SEAM TYPE | MAIN FEATURE |
| Chiffon | 70/10 Jersey | French or overlapping | Tissue paper underneath to prevent the fabric from slipping |
| Organza | 70/10 Universal | French or ribbon | Using weights instead of pins |
| Taffeta | 80/12 Universal | Machine standard | Don’t over-iron — mark iron scratches |
| Lace | 70/10 Microtex | By hand or slow machine | Cut on pattern; hand edges or tight zigzag |
| Satin | 80/12 Microtex | Standard, elastic stitch for lining | Avoid visible pins — mark the shiny surface |
| Velvet | 90/14 Universal | One-way standard | Cutting always in the same direction as the hair |
| Brocade / Damascus | 90/14 Universal | Standard with wide reserve | Match the patterns on the front as in upholstery |

Where to Buy Ceremony Fabrics Wholesale in Italy
For those who work on commission or run a laboratory, the choice of supplier is as important as that of the fabric. A good specialized supplier offers continuous assortment, quick sampling to show the customer, favorable conditions even on small meters and the possibility of receiving technical advice before purchasing.
Manifattura Foderami Cimmino, based in Naples and with an online catalog on cimminoshop.com, it supplies tailors and workshops throughout Italy with chiffon, organza, taffeta, lace, velvet, brocade, linings and much more: discover all the latest news and choose the fabrics that best suit your projects.
FAQ- Frequently Asked Questions about How to Sew a DIY Formal Dress
Taffeta is the most manageable choice for those with less experience with formal fabrics: it doesn’t fray excessively, holds its shape, and works well by machine without any special precautions. Satin and chiffon, although widely used, require more attention — the former due to its sensitivity to straight thread and pin marks, the latter due to its tendency to slip when cutting and sewing.
For a size 42, the reference values are approximately 3–3.5 mt for a column dress, up to 5–7 mt for a full skirt or full skirt dress. To these must always be added the meters for the lining and a margin of 10–15% for defects in the patch and filming. For trains, add 0.5 mt (short) or 1.5 mt (long) to the base silhouette.
For summer ceremonies, light and breathable fabrics are preferred: chiffon, georgette, organza in a light version or satin in a reduced weight. Taffeta, while manageable, tends to retain heat and is best suited to mid-season. Velvet and brocade are to be avoided — they are designed for the cold months.
Never apply iron directly to the fabric. The basic rule is always to interpose a clean cotton cloth between the iron and the fabric. For chiffon and organza, it is preferable to use indirect vapor or a vertical vaporizer, without touching the fabric. On lace, you never iron directly: you work on the reverse, on a soft cloth, so as not to crush the embroidered pattern. Velvet should not be ironed — steam is passed to eliminate creases while keeping the iron at a distance.
It depends on the fabric. In general, for clothes with delicate fabrics (chiffon, organza, lace, satin) hand washing in cold water with neutral detergent is the safest choice. You soak the dress without scrubbing, leave it to soak and rinse thoroughly. For dresses with decorations, beads, or colorful appliques, it’s best to rely on a specialized laundry: dry cleaning solvents remove grease, while water washing is more effective on organic stains (sweat, food).
Organza is rigid and holds its shape, ideal for structured and voluminous clothes. The chiffon is soft and fluid, perfect for draping and overlapping. Both are semi-transparent and require an opaque layer underneath. They are often used together: organza as an internal structure, chiffon as an external layer for a lighter effect.
Technically yes, but it is not recommended — especially for dresses with a structured bodice, full skirt or expensive fabrics. The toile (a test in cheap cotton) allows you to correct the pattern before cutting the final fabric, saving material and time. For simple dresses in standard size, you can skip the step, but it’s always a good idea to at least test the bodice.
The most reliable method is to first fix it with cold vinyl glue for fabrics, then sew it by hand following the edge of the pattern with an embroidery needle. You don’t run the machine directly over Chantilly lace: you risk distorting the pattern. If the lace is on an exposed edge, the margin should be cut flush with the pattern and finished by hand.